Create an Event
To create a ticketed event, select the Events tab in your navigation bar.

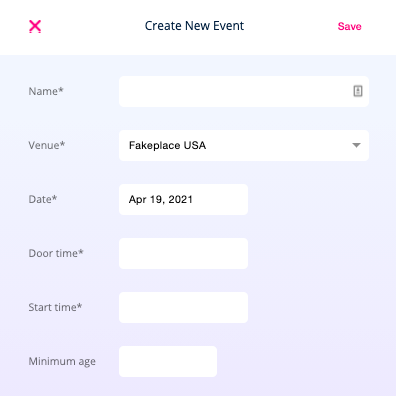
Once on the events page, click the pink “+” symbol to get started. Next, fill out the event name, select the venue, enter date, door time, show time, age restrictions, description, etc.
As you scroll down, you will also see an additional Ticket Logistics section.
- Ticket Limit: Adjust this field if you would like to restrict the number of tickets a patron can purchase per order.
- Enable Captcha: Select this checkbox if you would like to enable captcha authentication on your event, which helps prevent bot traffic.
- Sales Tax: Select this if you would like your pre-set sales tax fee to apply to this event.
- Processing Fee: Select this if you would like your pre-set processing fee to apply to this event.
- Email pdf tickets: Select this if you would also like your patrons to receive a PDF copy of their ticket.
- Donation: Select this option if you would like to be able to accept donations for this event.

Once the required fields are filled out, click Save. You will then be brought to the event page where you can create tickets for your event.
Creating Tickets for your GA Event
Click Add Ticket to add inventory.

The ticket module will pop out. Fill out the necessary details. and click Save.

Price: The face price of the ticket
Fee: Add any additional fee you want to collect, this will be bundled with the VenuePilot Fee
Start/End Sales: Set the on sale and off sale dates of this ticket
Selling Platform: Select if this ticket is available at the box office, online or both (using the VenuePilot iOS and iPadOS app)
Name: The name of the ticket type (Advance GA, DOS GA, etc.)
Quantity: How many tickets of this ticket type are available
Add a Section: Sections that allow you to sell multiple ticket types from one group of inventory. Read more at Sections: Explained
When you are done, click save, and you will be returned to the event view with your tickets showing.

4. Publishing your event
After you have set up a ticket type, click on the event name in the upper left-hand corner.

Once there, click on the purple bullhorn in line with the date of the event

On the module that pops out, you can set a date and time for the event to publish to your website, as shown below!

You can also add or edit the publish information to tailor it specifically for your event, such as:
- Event Name: Generally the headliner
- Promoter: Top line info
- Subtitle: Any additional top line info
- Start Announce: Schedule when your event gets pushed to your widget
- Event Image: Upload and edit a hero image to your event
- Social Media: Artists' social media links
- Description Box: Add additional show info, links, set times etc.
- Sell Tickets At: If you created tickets, your link should be here, if you're using an external ticketing link, paste it here.
- Button Text: Edit the text on your purchase button
Make sure to click 'Save' at the bottom of the announce modal to save your changes! Once you've saved your first changes, you can hit 'Update' to save additional changes.
If you have added artist social links and do not see them populate onto your widget, please contact us at clientsupport@venuepilot.co to make a slight update to your widget.
Once you click Save, your event is all set to be published and go on sale.
You can copy both a direct ticket link as well as a Handstamp Event Details page link on your ticketing page to share to your networks and in marketing materials
