---
title: Ticket Counts
description: We are excited to introduce Ticket Counts. This is the upgraded version of our original Shareable Link feature. Not only can you still generate a real-time, shareable link that updates instantly for the duration of your show, but you can now schedule automated email reports to keep your artists, promoters and stakeholders in the loop.
---
[Skip to content](https://support.venuepilot.co/knowledge/ticket-counts#main-content)
English
Show submenu for translations

Open main navigation
Close main navigation
- English
Show submenu for translations
- Contact us
Contact us
Search our Knowledge Base
- There are no suggestions because the search field is empty.
1. [VenuePilot Support](https://support.venuepilot.co/knowledge?hsLang=en)
2. [Reports](https://support.venuepilot.co/knowledge/reports?hsLang=en)
# Ticket Counts
## Real-Time Sales Sharing & Scheduled Reports
Using this feature, you can generate a **real-time, shareable link** that updates instantly for the duration of your show as well as **schedule automated email reports** to keep your artists, promoters and stakeholders in the loop.
### Navigate to Ticketing Admin
Go to the **Ticketing Admin** page for the event you’d like to send counts for:
Click on the event in your calendar or events list then click on the ticket icon next to the confirmed event name, as shown below:

### Click on Ticket Counts
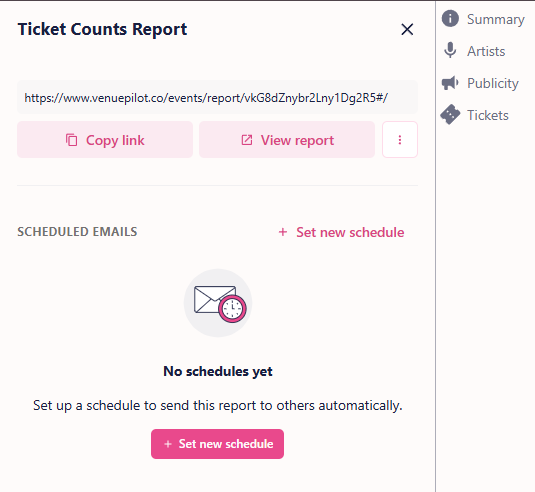
Click on **Ticket Counts**. A side drawer menu will slide open from the right side of your screen where you can manage your email counts.

### Option 1: Copy or View the Real-Time Shareable Link
At the top of the side drawer, you will find our classic real-time shareable report. This is perfect for stakeholders who prefer to check in on sales manually. Copy this link to send to anyone who needs a live, up-to-the-minute look at your sales.
### Cancel and Re-issue the Link (If Needed)
If you accidentally send the link to the wrong person, click the **three-dot kebab menu (`...`)** next to "View Report" and select **Cancel and Re-issue Link** to immediately deactivate the old link and generate a new one.
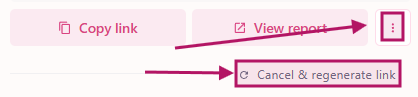
⚠️ **Note:** Anyone using the old link will lose access immediately, and you will need to send them the new link.
### Option 2: Start a New Email Schedule
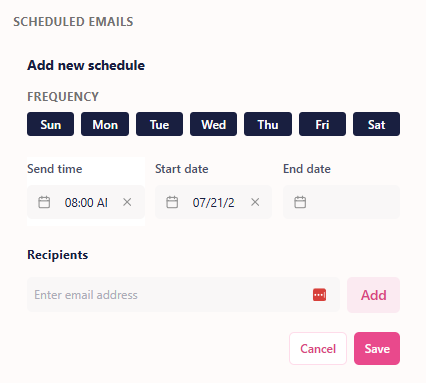
To automate your updates, scroll down to the **Scheduled Emails** section and click **Set New Schedule**.
#### Step 1: Choose Your Email Frequency
Under **Frequency**, select which days of the week you want the email to send. By default, all 7 days are selected. Click on any day to deselect it if you only want to send updates on specific days (like Tuesdays and Thursdays).
#### Step 2: Set the Send Time
Use the **Send Time** field to choose the exact time of day you want the email to go out. This is the same time zone as your event.
#### Step 3: Select Start and End Dates
Use the **Start Date** and **End Date** fields to choose when these emails should start and stop. By default, the start date is set to today and the end date is set to your event date.
#### Step 4: Add Your Recipients
Type in the email addresses of your stakeholders one by one. Once added, they will populate in a list below. If you need to remove someone, simply click the **Trashcan** icon next to their email.
#### Step 5: Save Your Schedule
Click **Save** to activate your automated schedule.
#### Step 6: Manage and Modify Active Schedules
Your saved schedules will now appear at the bottom of the drawer. From here, you can:
- Click the **down arrow** to expand the list and see all recipients.
- Click the **three-dot kebab menu** to make changes or select **Resend Emails** to manually push the report to anyone who missed it.
### **💡 Troubleshooting & Tips**
- **Emails not arriving?** If your stakeholders report that they are not receiving their scheduled sales emails, please have them check their **Spam/Junk folders** and mark VenuePilot as a safe sender.
- **Multiple Schedules:** You can create multiple different schedules! For example, you can send daily updates to your internal team and a separate weekly report to the artist's management.
---
### **Real-Time Data: The Shareable Link**
As an alternative option, you will also find a **[Shareable Link](https://support.venuepilot.co/knowledge/shareable-report?hsLang=en)** at the top of the ticket modal. This isn't a static snapshot, it is a live URL that updates in **real-time**.
- **Instant Access:** Copy the link to share via Slack, text or email for instant visibility.
- [Ticket Buyers](https://support.venuepilot.co/knowledge/ticket-buyers?hsLang=en)
- [Get Started with VenuePilot](https://support.venuepilot.co/knowledge/get-started-with-venuepilot?hsLang=en#main-content)
- [Onboarding](https://support.venuepilot.co/knowledge/get-started-with-venuepilot?hsLang=en#onboarding)
- [Calendar](https://support.venuepilot.co/knowledge/calendar?hsLang=en)
- [Manage Events](https://support.venuepilot.co/knowledge/manage-events?hsLang=en#main-content)
- [Email Confirmations](https://support.venuepilot.co/knowledge/manage-events?hsLang=en#email-confirmations)
- [Access & Discount Codes](https://support.venuepilot.co/knowledge/manage-events?hsLang=en#access-discount-codes)
- [Ticketing](https://support.venuepilot.co/knowledge/manage-events?hsLang=en#ticketing)
- [Event Management](https://support.venuepilot.co/knowledge/manage-events?hsLang=en#event-management)
- [Templates & Budgets](https://support.venuepilot.co/knowledge/manage-events?hsLang=en#templates-budgets)
- [Marketing](https://support.venuepilot.co/knowledge/marketing?hsLang=en#main-content)
- [Pixels](https://support.venuepilot.co/knowledge/marketing?hsLang=en#pixels)
- [Box Office & Scanning](https://support.venuepilot.co/knowledge/box-office-scanning?hsLang=en#main-content)
- [Box Office Reporting](https://support.venuepilot.co/knowledge/box-office-scanning?hsLang=en#box-office-reporting)
- [Selling](https://support.venuepilot.co/knowledge/box-office-scanning?hsLang=en#selling)
- [Scanning](https://support.venuepilot.co/knowledge/box-office-scanning?hsLang=en#scanning)
- [Reports](https://support.venuepilot.co/knowledge/reports?hsLang=en)
- [Hardware & IT](https://support.venuepilot.co/knowledge/hardware-it?hsLang=en)
- [Integrations](https://support.venuepilot.co/knowledge/integrations?hsLang=en)
- [Website integrations](https://support.venuepilot.co/knowledge/website-integrations?hsLang=en)
- [VenuePilot University: Producing and Managing Independent Events](https://support.venuepilot.co/knowledge/venuepilot-university-producing-and-managing-independent-events?hsLang=en)
- [Announcements](https://support.venuepilot.co/knowledge/announcements?hsLang=en)
[](http://venuepilot.com)
[mailto:info@venuepilot.co](mailto:info@venuepilot.co)
Copyright © 2026, VenuePilot